Tutorials
¿What is a Restricted Channel?
Restricted Channels are Channels that will only be accessible with a username and password.Creating a Restricted Channel
Here you will find step by step instructions on how to create a Restricted Channel.Tutorial requirements:
- Restricted Channels extension.
NOTES:
- In order for the Restricted Channels to work with the iPhone/iPod Touch extension, you will need Simple Web TV version 1.1.10+.
- The user interface of the following screen captures may be different than yours, since it depends on the operating system your are using (Windows XP, Vista, Mac OSX, etc).
Open the WebTV´s Content Administrator. To do it, add /admin to your WebTV´s URL.
Example: http://www.webtvdomain.com/admin
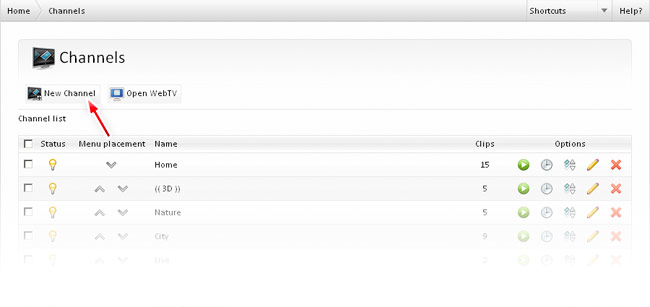
Click on the "Channels" button; the corresponding page will open.
Once inside the "Channels" page click on the "New Channel" button:

(Creation steps are exactly the same as conventional Channels).
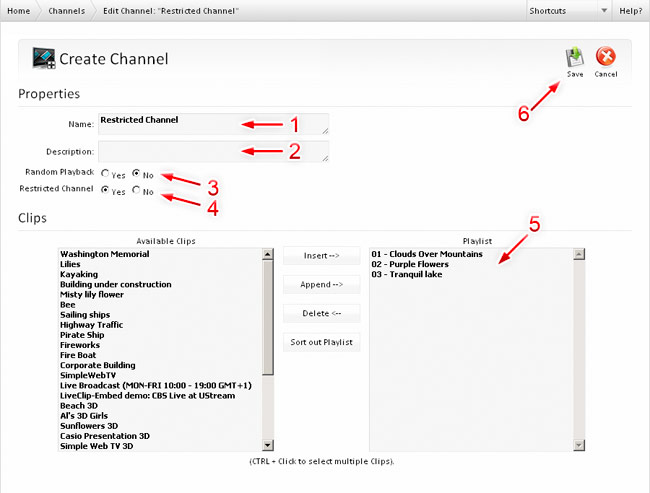
The Channel creation page will open:
1) Enter the Restricted Channel "Name".
2) In the "Description" field enter a brief description for your reference (the description is not public).
3) Select whether the Channel will playback the Clips randomly or not.
NOTE: If you select "No" the Clip playback order will be the specified by the Playlist using the "Sort out Playlist" option. If you select "Yes" the Playlist sorting will be ignored and the Clips will be played back randomly.
4) Select whether the Channel is Restricted or not (check Yes).
5) Include the desired Clips into the Channel.
You can add or deleted Clips by using the "Insert", "Append" and "Delete" buttons.
NOTE: If you include a Clip into a Restricted Channel, avoid including it into a public one too.
6) Click on "Save" and the Channel will be created.NOTE: All the Channel properties can be edited anytime.

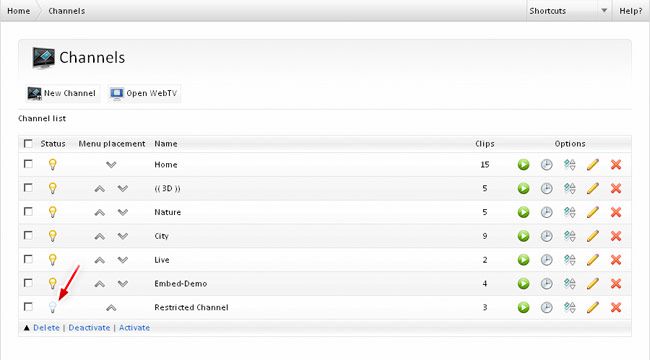
The Channel will appear in the Channel list.
NOTE: Every time a Channel is created, it will have an "Inactive" status, the Channel won´t be publicly available until you decide to activate it.
Go to Home > Channel's Users; the corresponding page will open.
Once inside the "Restricted Channels's Users" page click on the "New User" button:

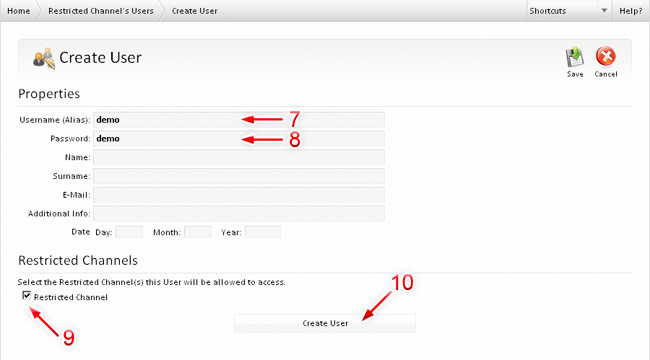
The User creation page will open:
7) Enter the Username (Alias) for the User (must be unique).
8) Enter the Password for the User.
Optional fields (to help you identify a user):
• Name
• Surname
• Additional Info
• Date (the date will be automatically filled in if not specified)
9) Check the Restricted Channel(s) this User will be able to access.
10) Click on "Create User" or "Save" and the User will be created.
NOTE: All the User properties can be edited anytime.

The User will appear in the Users list.
NOTE: Every time a User is created, it will have an "Inactive" status.
Activate the User by clicking the gray light bulb (once activated it will turn yellow).

Since you have just defined a User for the Restricted Channel previously created, it is time to activate the Channel.
Go to Home > Channels; the corresponding page will open.
Activate the Restricted Channel by clicking the gray light bulb (once activated it will turn yellow).
(A Channel must be "Active" in order to appear in the WebTV).

That´s all! you just have created a Restricted Channel with one associated User.
NOTICE
• If you modify a User's Restricted Channel access, the modification won´t be effective until the User logs out and logs in again.
REMEMBER
• User accounts can only be created from the Content Administrator.
• Restricted Channels won´t work with the the iPhone/iPod Touch one; Restricted Channels will be excluded when visiting the WebTV from the iPhone/iPod Touch extension.
• Restricted Channels extension is not a DRM solution.
• Restricted Channels extension does not protect the content (videos) against copy, download, etc., it simply adds a basic protection layer to limit Clips and Channels access.
