Tutorials
Styler: Creating a visual style

Customizing Simple Web TV: Here you will find step by step instructions on how to create a visual style.
Tutorial requirements:
- Simple Web TV version 1.3+
- Styler extension.
NOTES:
- Although there is no limit regarding the number of styles you can create, only one of them can be active at a time (the one showed on the WebTV).
- Styler does not support Internet Explorer 6.
- Some adjustments, like border roudness, will only be effective on Web browsers with CSS3 support, like Internet Explorer 9, as well as the latest versions of Chrome/Safari, Firefox and Opera.
- The WebTV rendering speed might be slower when using visual enhancements like roundness, transparency, shadows...
Open the WebTV´s Content Administrator. To do it, add /admin to your WebTV´s URL.
Example: http://www.webtvdomain.com/admin
Click the "Configuration" button; the corresponding page will open.
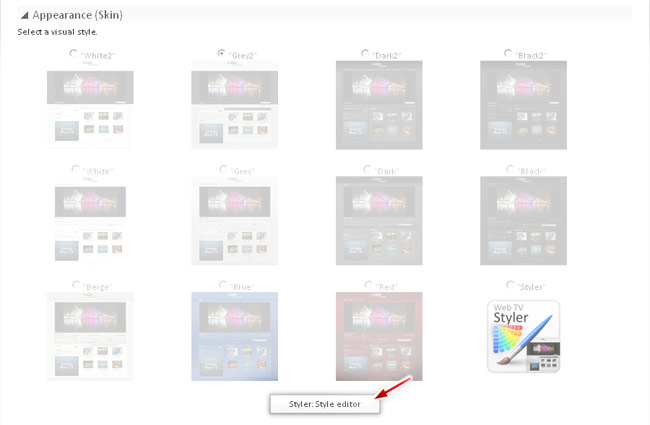
Once inside the "Configuration" page scroll down to the "Appearance (Skins)" section and click the "Styler: Style editor" button:

A message will be displayed, warning about saving any change you might have made to the configuration section before proceeding. If you have not made any changes to this section, simply click "OK"; otherwise, cancel the operation, save your changes and proceed again.
The Styler page will open, click the "New style" button.

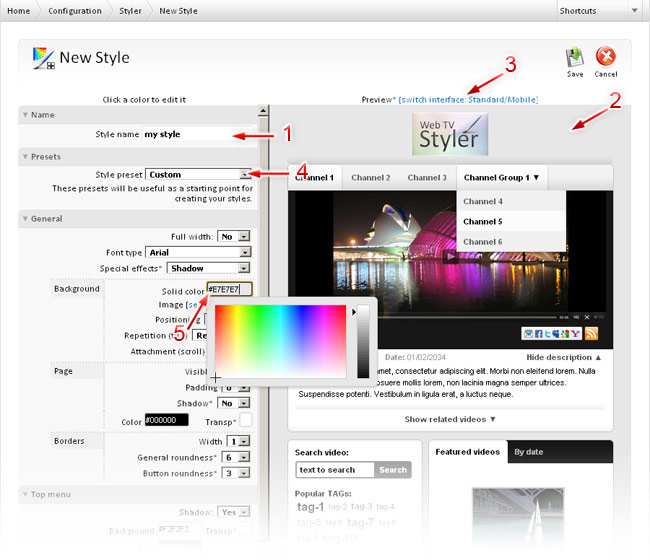
The style creation page will open.
Options explanation:
1) In this field you can enter a name for the style (up to 100 characters).
2) This is the preview area: All the adjustments you make will reflect into this area, in real time.
3) By clicking this text button, the preview will switch between the Standard a the Mobile (iPhone) interface.
4) In this dropdown you will be able to choose a preset that will help you as a starting point for creating your styles.
5) To edit a color, simply click on it.

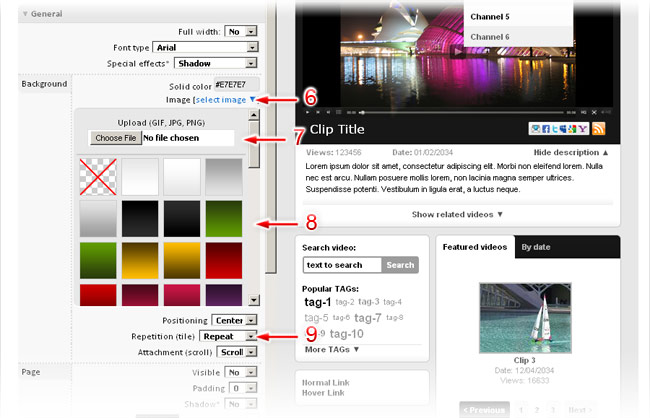
6) In order to use a background image, click "select image" located in the "Background" group of the "General" section.
7) You can use your own image for the background; click to browse for it (JPG, GIF or PNG format) and then Save the style. After saving, the image will appear in this section.
8) You can also use one of the supplied background images; just click the one you want to use.
9) To control how the image is positioned, centered or repeated, use these controls. If you are not using any background image, these controls will have no effect.

In this point, we encourage you to experiment with the different adjustments until you achieve the desired look.
Once you are happy with the results of your adjustments, save the style.
Click on "Styler", in the top menu bar, to return to the style list.
You can create as many styles as you want; however, only one of them can be active at a time (the one showed on the WebTV). In order to activate the desired style, click the gray lightbulb: it will change to yellow:

Click on "Configuration", in the top menu bar, to return to that section.
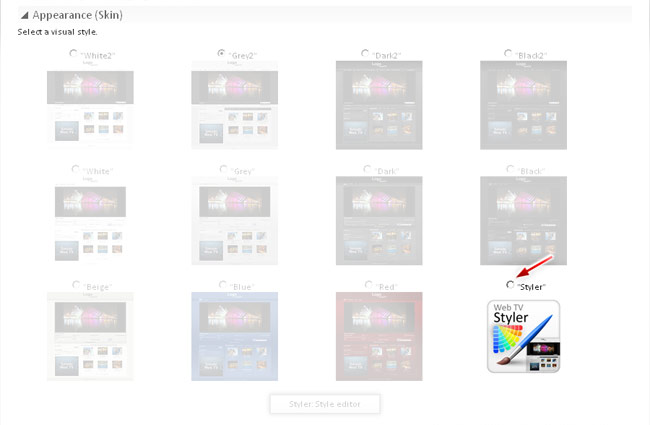
Finally, in order to publicly display the active style, you must select the "Styler" as the Skin of the WebTV and save the configuration.

That´s all!.
